New Features
New Blog! Check it out today.
We are thrilled to share our new blog site – check it out here: NEW WebReserv Blog
We continue to share our knowledge of the rentals, tours, and lodging industries including using tips for your business and how WebReserv works with you.
Thank you for reading and sending feedback.
Contact us today for any questions you have about WebReserv and your online booking system.
‘Tis the Season! How to increase your revenue this holiday season with Gift Card sales.
Selling gift cards / certificates online is a great way to increase sales, especially during the holiday season. But don’t forget that you can benefit from selling gift cards and certificates throughout the year. Advertise your gift cards to previous customers – they already know you offer a great service, so it is a convenient way for them to offer a personal experience.

The In/Out Report – a great tool for managing your rentals
WebReserv offers various types of useful reports. The In/Out report is an excellent report that will help you manage your rental inventory.
The In/Out report is similar to a Reservations Report except it will define what rentals are going Out for the day, and what rentals are due to come back In for the day. This is very helpful during busy times when you need to keep track of bookings and your inventory while still providing the best customer service.
In order to activate the report to work for rentals, follow the steps below.
- In your WebReserv account, go to Setup – Business Information – Advanced Options. In the General section, set the Check In/Out option to “Check-out before Check-in“. Save your changes.

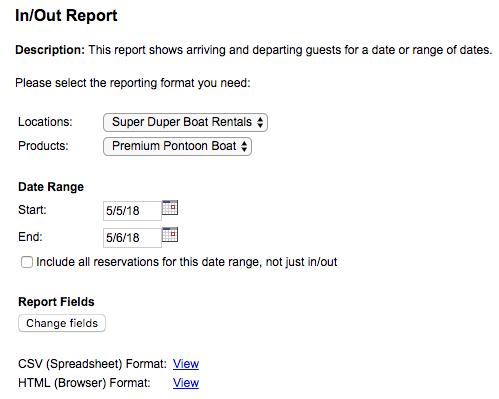
2. To run the report, go to Frontdesk – Reports – select In/Out Report.
- Select your product or ALL.
- Enter your date range.
- Select if you want the report to show only Out and In dates (default), or if you want to see all bookings in between those dates.
- Choose the Change fields button to customize what columns you want to see on the report.
- Select what format you want to view the report in – HTML will open in a new browser or CSV will download the report into a spreadsheet (Excel).
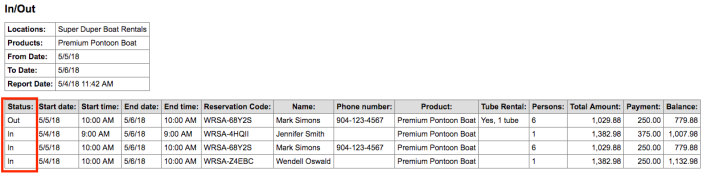
Based on your report settings, the report will show first all rentals that will be going OUT for the date range, and then it will show all rentals that will be coming IN for that date range. This will be noted in the Status column.
If you want to know more about all the features that WebReserv offers, visit us at www.webreserv.com, or send us an email to support@webreserv.com.
You asked, we answered! New Enhancements to WebReserv.
That’s right, we’re listening! We recently made a few enhancements to the booking system, and we’re excited to let you know about them. See what we’ve done below.
Added a Search by Reservation Date to the Reservations report.
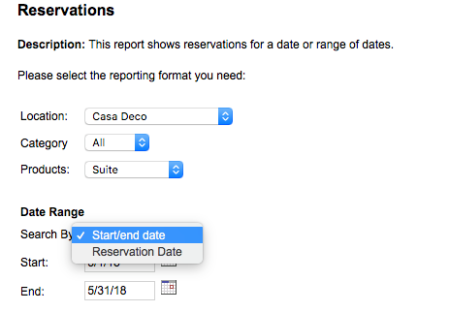
The Reservations report is our most comprehensive report that gives you all the details about bookings within a time frame that you specify. You now have 2 options for that time frame: Date of Reservation or Start/End Date. Date of Reservation refers to the date that the booking was actually made by the customer. Start/End date refers to the actual visit date of the booking. This is a helpful enhancement as it will allow you to see how many bookings you had on a given day or set of days.
To access the report, navigate to Frontdesk – Reports in your account. Select the Reservations report.
Additional Customization options on the Home page.
The first view that you see when you log into your WebReserv account is the Home page. This is your dashboard and will list all recent bookings in your system. You are able to customize what columns from the booking that you want to see on this page. We recently added additional options for columns to further customize how you want to view your bookings. New options include:
1. Customer’s phone number
2. Customer’s email address
3. Unit name (if defined)
4. Office Notes
To customize your Home page, click on “customize this page” from the Home page. On the Customize Page screen, drag and drop the desired columns from the Available Columns box to the Selected Columns box. Save your changes.
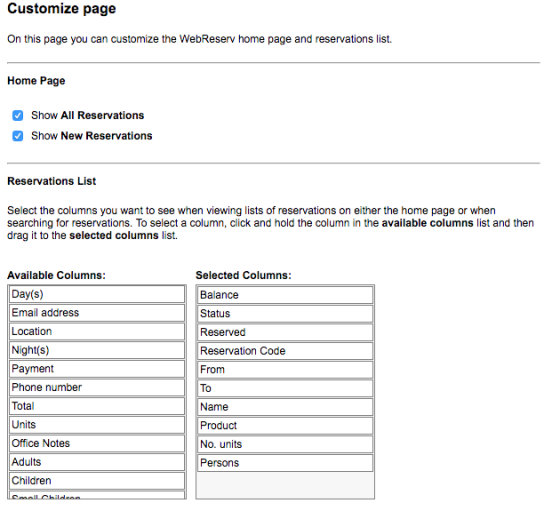
Here’s a look at the view with all the new options added. This is helpful for many businesses who want to be able to see the customer’s phone number at a glance to reach out to them, or see exactly what rental or camp site is booked for the day.

We always strive to make improvements and enhancements to our booking system. If you have any suggestions, please send us an email to support@webreserv.com. We’d love to hear from you!
Daily Manifest Added to Reports
We recently added a new report to our list of available reports in WebReserv: Manifest Report. This report is great for businesses that need a daily look at who is booked for a given day(s). It helpful when assigning guides to your tours, or ensuring you have enough staff on hand for your rentals.
To access this report, go to Frontdesk – Reports – Manifest Report.
Customize the report:
- Select which tour/rental (Products) you want to view.
- Enter the date range.
- Pick a time slot (Schedule), if applicable.
- Select Change Fields to customize columns in the report.
- Choose to download into a CSV (spreadsheet) or open in a new window (Browser)

Click View to run the report. See below shown in the HTML format.

This is a great addition to the already robust report options in WebReserv.
Stripe added as a Payment Processor
Welcome to 2018! We’re excited for the new year, and happy to announce that we’ve added a new option to our list of compatible payment processors: Stripe. 
To get an account with Stripe, visit their website to create an account.
If you have an existing Stripe account, you can add the integration to your WebReserv account easily.
To do so, log into your WebReserv account, and go to the Setup – Business Information. Select Payments from the left column.
First, you’ll want to enable the credit card option in the Payment Processing section. Select Creditcard, and Auto Process.

Next, in the Payment Gateway section, select Stripe from the drop down menu. Here you will enter your Secret Key from your Stripe account. (Note: you can access your Secret Key through the Dashboard of your Stripe account.) After you add the secret key, save your changes by clicking Save and continue at the bottom of the page. 
That’s it! You’ve successfully setup the integration with Stripe.
After setup is complete, you’ll want to make a test transaction to ensure it is working properly. The system allows you to enter a test transaction through the Payment Center. To access, go to Frontdesk – Payment Center. Select the ePay Virtual Terminal option.
Here you can enter a small transaction using a credit card to ensure that you get an authorization. To do so, select Payment (type), Credit Card (payment type), and enter a small amount – $0.10 will work fine.

Enter the credit card details. Choose the Process Payment button at the bottom of the page. If you get an authorization, then the setup is working correctly.

You can now begin taking payments for your bookings. For more information on WebReserv, visit our website, or contact us here.
New customization options for iCal integration
We recently released an enhancement to the calendar synchronization feature in WebReserv. You can now customize your iCal URL by rental, tour, or room. This upgrade will allow you to sync bookings, per product to your chosen calendar site such as Airbnb, VRBO, or Google. This will make it easier to manage bookings on the various sites you use.
To access the new links in your WebReserv account, go to the Setup →Business Information → Advanced Options. You’ll see the iCal section under External Calendar Synchronization (iCal, Airbnb, Google, Apple and others).
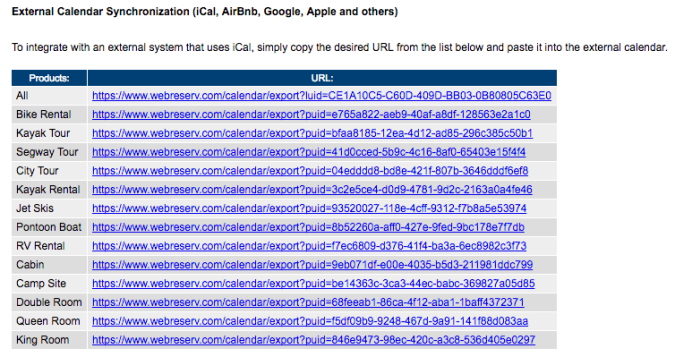
Here you can select which URL you want to add to your external calendar ⇒ choose All or just for a certain product. Copy the URL and paste into your other calendars.
Note: Each external calendar integration will have its own steps to add the URL. See the Help for that calendar for complete instructions.
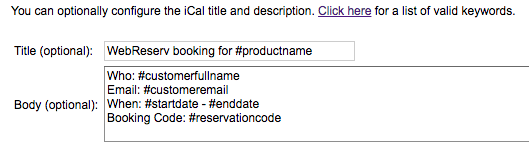
In addition, you can further customize the data that is shown on the calendar using keywords from the booking. Enter your choice of text and keywords in the Title and Body section of the setup, and this information will populate your calendar when a new booking is made in WebReserv.
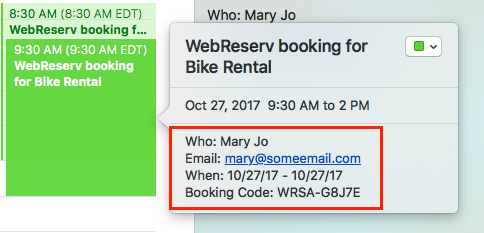
Once you add the URL to the chosen calendar, then when you receive a booking in WebReserv, it will be shown on the calendar on the day of the booking. Viola!
Want to know more about how to manage your bookings with WebReserv? Visit us at WebReserv.com and sign up for an account today!
New payment gateway available – Braintree
 You’ve been asking for it and here it is. We are proud to announce that we just integrated a new payment gateway to our booking system. This is a great news as it will allow you to receive automatic online payments no matter where your business is based in Europe (check the list of the supported countries here). Also, it will make your booking process more automatic and very easy for your customers resulting in more reservations and less manual processes.
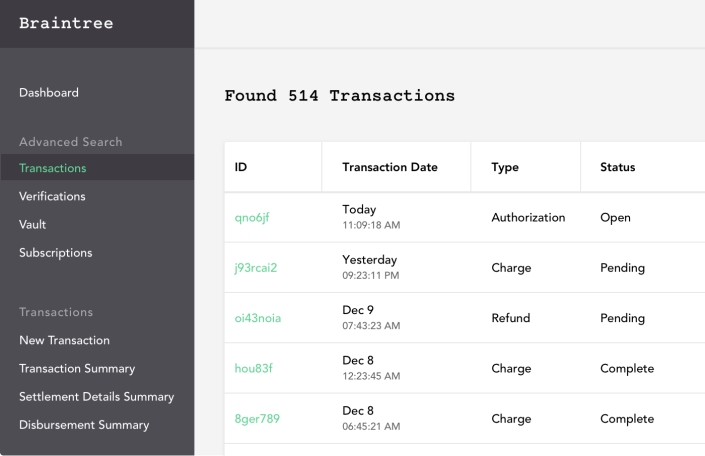
What is Braintree?
Braintree helps businesses of all sizes, from small to large enterprise, accept and process payments to help maximize business opportunities and revenue growth. Companies around the world benefit from the technology and service of Braintree coupled with the scale, backing, and confidence of the PayPal network. Braintree allows you to sell where and how you want with a flexible and scalable platform. Plus, get paid quickly — most payouts happen within two business days of transaction settlement.
With the same cost per transaction than Paypal, Braintree goes further in the integration with your WebReserv booking system. Using Braintree you can manage all your transactions and refunds directly from the WebReserv control panel. Also, from a customer perspective the payment is as simple as adding the credit card details and there is no need too leave the booking page. 100% integrated, flexible and safe, doesn’t it sound like a great new feature?
Besides, Braintree provides clear insights for your business with their own seamless control panel you can access easily from any device.
Braintree know that a good service is also important. Any problem with your transactions? Braintree gets your questions answered quickly by a real person.
Want to sign up with Braintree? Easy! Click here and start receiving online payments in just a few days.
For general information about online payment in WebReserv, see our help file here.
How to synchronize Braintree and WebReserv?
Once you have created your account with Braintree you will need to set it up in your WebReserv account. To do so, first of all, login to your WebReserv account.
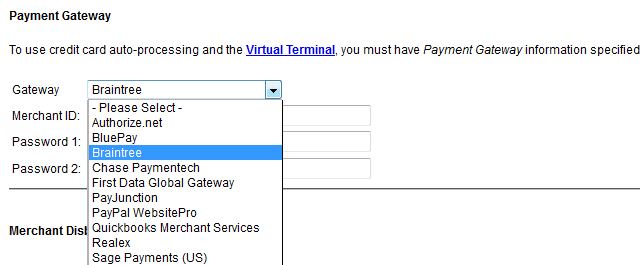
Once you’re there, click Setup – Business information – Payments, then under Payment processing select Credit card – Auto process

Then go the field Payment Gateway and select Braintree and add your Merchant ID, password 1 and password 2.
Now you just need to setup the deposit you want to get for each product at the reservation time. To do so, click Setup – Products and reservation rules – select a product – Tax/deposit and setup your deposit. You can choose between charging the full payment, a percentage, a fix amount or other options.

Congratulations, your payment gateway has been setup; you can now receive online payments with your reservations.
We hope you will enjoy the benefits of that fantastic new feature on WebReserv. Feel free to contact us for any additional question.
We wish you good business
The WebReserv Team
WebReserv and Google Conversion Tracking
 The WebReserv system comes with a great feature for your business – Google Conversion Tracking. Conversion Tracking gives you the ability to know which of your AdWords campaigns are producing conversions. This is an important tool for your business. We will explain how it works with the WebReserv system below.
Understanding Google Conversion Tracking (AdWords)
Google Conversion Tracking (AdWords) is a free tool that allows you to track the effectiveness of your Google AdWords campaigns. By tracking these actions, known as “conversions,” you’ll know which ad, keyword and campaign brings you businesses. Consequently, if you use Google conversion tracking with WebReserv you will be able to determine how many of the bookings you received through WebReserv came through your AdWords campaign. Read the rest of this entry »
4 great new booking system features
 We are very excited to announce that a new version of the WebReserv Booking System will be released on October 1, 2013.
The new version includes 4 great, new features that will make it even easier to manage your online bookings.
Wait list for tour reservations (tour booking system)
The new version includes a waiting list feature for tour reservations/tour bookings. With the wait list, customers can sign up to be notified if a booked tour becomes available, or if new time slots are added. Plus, the notifications to your customers are automatic, so no extra work is needed on your part. The wait list feature is currently only available for schedule-based reservations, and you must be using Booking Calendar 2.0. A future version will include a wait list for hourly, daily and nightly reservations.
To enable the wait list, go to Setup – Products & Reservation Rules – select Tour – Schedules. In the Schedules setup, set Allow customers to waitlist to yes.

