‘Tis the Season! How to increase your revenue this holiday season with Gift Card sales.
Selling gift cards / certificates online is a great way to increase sales, especially during the holiday season. But don’t forget that you can benefit from selling gift cards and certificates throughout the year. Advertise your gift cards to previous customers – they already know you offer a great service, so it is a convenient way for them to offer a personal experience.

New Blog! Check it out today.
We are thrilled to share our new blog site – check it out here: NEW WebReserv Blog
We continue to share our knowledge of the rentals, tours, and lodging industries including using tips for your business and how WebReserv works with you.
Thank you for reading and sending feedback.
Contact us today for any questions you have about WebReserv and your online booking system.
Online Reviews: How to get your customers to write one
Let’s face it, we all want to be liked. This is true for individuals as well as your business. You’ve worked hard to provide an excellent service to your customers, and it’s a great  reassurance when customers sing your praises.
Online reviews are key if you want to attract more customers to your rental, activity, or tour business. Nowadays, travelers and adventure seekers use online reviews when deciding where to go and what to do. Beyond a personal endorsement from a friend or family member, an online review is the next best thing.
How do you encourage your customers to write a review without seeming too pushy or violating a rule on the review sites? It’s a fine line indeed, so let’s share simple ways it can be done tactfully.
Make it easy
Have links to your review sites posted on your website as well as in your storefront or shop. In addition, after their visit send them a follow up email thanking them for their visit, and add a link to your review site. If you use an online booking system, many will offer automatic emails that can be set up to send a day or two after their visit.
Get clever
Come up with a creative way to entice a customer to post a review. A great idea is to give your parting customers a small gift, such as a key chain, water jug, or coaster that includes a note card on it asking them how they liked their experience. “How’d you like us? We’d love to know.” Add the link to your Yelp or TripAdvisor page to the note, so they will know where to go. This simple gesture will likely stand out to your customer enough that they’ll want to share it. After all, it’s the little things in life that mean the most.
Just ask
At the end of their visit, ask them to write a review. If they had an awesome time, then this is a easy task for a customer to do. Asking may feel uncomfortable, but if it’s done in a gracious and humble way, then it will be appreciated. If you’re sure they’ve had a great time, then say something like, “I would appreciate it if you told your friends and family about us. In fact, if you go to our page on Yelp, you can write about your experience.” Give them the link, and say thank you.
In the end, it’s important to recognize that as a small business, good or bad reviews can be the deciding factor for choosing you. Provide an excellent service, engage your customers, build rapport, and this will naturally bring people to review you. In addition, respond quickly and appropriately to negative reviews. Doing so, will show a potential customer that you care and want to make things right if it wasn’t. That type of business mindset speaks volumes. Cheers!
End of Season? How to keep the momentum going during your off time.
As a seasonal business, you get the benefit of having some down time when you are in your  off season. You’ve worked so hard this summer with your rental or tour business, that you’re due for a much needed break. Alas, you’d love it if you were able to continue to receive bookings for next season, right? Check out these tips below on how to keep things rolling while you are taking a break.
24/7/365 Booking with an Online Reservation System
Many travelers (myself included!) love to plan their next adventure right after they get home from vacation. For popular vacation destinations, booking early is the key to get what you want for rentals and activities. Allowing your customers to book for next season is important and appreciated. Having an online booking system** that is up to date and shows your availability for next season is a great way to get bookings while you are sipping Mai Tais in Hawaii (what? you’re not?). Customers can book at anytime that is convenient for them, and do not have to contact you directly to make a reservation. It’s a win-win for both you and the customer.
**If you don’t currently have an online booking system, now is the time to get one! WebReserv offers an affordable and easy to use booking system for rentals, lodging, and tours. Contact us today for more information.
Offer Early Booking Discounts
Traveling is fun, but it can also be expensive. If you offer discounts for booking early to your customers, this is a great way to earn income during your downtime. Everyone is looking for a great deal, and offering a small discount for booking their next summer adventure early is an excellent way to lock in that reservation now. Setup a promo code using your booking system, and advertise the code on your website.
Reach out to your Customers
Utilize your favorite email marketing program to send newsletters or updates to your customers over the winter season. Add pertinent information about your business and include upcoming excitement for next season (“Brand new kayaks or “new sunset tour added“). This will keep your business fresh in their mind as they’ll remember what a fun time they had while visiting. Include that discount code you created for early booking in the information, too!
All in all – enjoy your off time as well as look forward to your next season with incoming sales all year round.
Website Makeover: does your webpage need one?

As a tour and rental operator, your website is your best (and perhaps only) marketing tool you have. Your website is a reflection of you and your offerings, so if you haven’t checked in with your site since it was created, now is the time to do so. Check out these tips to help your website with its makeover.
Update your Content & Pictures – Having great descriptions of your offerings along with beautiful pictures is essential. Review your content on your site, and make any updates to descriptions and images to ensure you are presenting your business in the best way possible. Don’t forget to proofread! Spelling errors and incorrect grammar is a huge turnoff to potential customers.
Be clear and concise – When a visitor goes to your website, make sure the information is clearly laid out in an easy to understand manner. If your site is confusing or difficult to navigate, then visitors will likely leave right away. Get ideas from other websites when it comes to design and content. Find what you like about other sites, and incorporate the best aspects into your own site. Review your site with the customer in mind, and make adjustments as needed.
Mobile Friendly is your Friend – How does your website look on a phone or tablet? A  high percentage of customers looking for your services will be uses these types of devices for find you, so it’s crucial that your site it mobile friendly. Many website builders (such as Wix, Weebly or Wordpress) have template designs that are responsive. Responsive means that when your site is viewed it will resize itself to look good on that device. Make sure your site is either responsive or have a separate site that is specific to mobile users.
Work on your SEO – Search Engine Optimization (SEO) is the process of optimizing your website so it results in your site’s higher ranking when doing a Google search. It’s crucial for you to make certain that your site comes up at the top when folks are searching for activities or rentals that match your business. Simply put – if your website comes up first, chances are that visitors will click on your site and book with you. Do your homework to ensure your SEO is at it’s best.
Call to Action – As a tour or rental business, you want to make it easy for potential customers to book with you. This means you’ll need to have the ability to book online through your website, and make the process seamless with an easy to use checkout process. A Call to Action is button or link on your site that gives them this option to “Book Now” or “Contact Us”. Adding these buttons to each page of your website is ideal.
Updating your website from time to time is a great way to stay on the top of your game. If you’re not sure how to go about doing this, and you have it in your budget, hire a professional. There are many great and talented website designers out there that can assist you in building or updating your site.
Doing what you Love and Getting Paid: the need for a Payment Gateway.
Getting paid. It’s an important part of your business, right?! As a small business owner, you went into business because you LOVE what you do AND you wanted to get paid for it. It’s a wonderful match, so you’ll want to make sure you know how to achieve this. In order to get paid for the service you provide, you need a payment gateway. 
What’s a Payment Gateway, you ask? In short, the payment gateway is what allows you to take online payments, and is the bridge between your booking platform and your bank account. If you own a rental business or a tour company, and want your customers to not only book online, but also pay online, then getting a payment gateway is the way to go.
Payment Gateways are a great asset to your business and gives you and your customer the piece of mind that is needed when purchasing a service online. Some of the key features are Security, Convenience, and Compatibility.
Security: This is probably the most important feature when considering taking payments. This means choosing a payment gateways that is equipped with fraud prevention and one that is compliant with PCI standards such as data encryption when storing credit card information.
Convenience: Having a payment gateway allows you to receive purchases and bookings 24/7. It alleviates you from having to get the customer’s credit card information, and manually enter it to get paid. It all happens in an instant with a payment gateway, and you’re paid right away.
Compatibility: You’ll want to select a Payment Gateway that easily integrates into your platform. In addition, if you’re using a booking system to take online bookings, make sure you confirm that the two systems can connect. This is ideal so that your customers can book and pay all within the same system. Talk about a seamless experience!
So, how much does this all cost? A payment gateway will charge fees on processing a transaction for you. Fees usually are structured per each credit card transaction. A common price structure would be 2.9% + $0.30 per transaction (higher rates apply for international). Take note of other fees that apply such as for refunds, chargebacks, and perhaps a monthly fee. Make sure you know up front what all the fees are so there are no surprises.
Now, who to choose? Do your research! This is a big choice and there are many options out there. Make sure it meets the needs of your business and use these tips here to help you decide which is right for you. Some of the biggest players in this industry that all have great reputations, and meet these 3 key aspects of security, convenience, and compatibility are Stripe, Authorize.net , and PayPal.
5 Tips to get more business this Summer
 It’s summertime and this is the time your business thrives. Whether you run a kayak or mountain bike rental shop, fishing charter, or have a few rental cabins in the mountains, you are always trying to attract more customers to choose you when making their summer plans. Try these tips to help you not only get more business this summer, but throughout the year.
Be active on Social Media As a business owner, social media is a very important outlet to advertise your services and offerings. If you haven’t already, create a business page on Facebook, Instagram, and Twitter, then fill it with awesome pictures and information about what you offer. Ask happy customers to like your page, follow you, and post comments/reviews on your pages. You should post interesting things daily including images or something cool in the news related to your business.
It’s important to show potential customers your genuine self, and these social outlets are a great way to do that. Try not to be too ‘salesy’ in your posts and responses. Normal folks want to do business with other normal folks, so don’t be afraid to show who you are mixed in with what you do.
Join In! Join other Facebook groups where potential customers might go, and actively participate in comments. More than likely, you’re in business because you love what you do. It’s easy to find other folks that also love the same thing through Facebook groups. Find those groups, and engage with others. For example, if you own a water sport rental business, join groups geared toward kayakers or paddle boarders. If you have a cabin rental in a popular hiking area, join a hiking group. Then answer questions that come up, and be helpful and encouraging. Don’t use the forum to continually promote yourself, but instead be helpful by answering questions or encouraging others when they post about their experiences with the activity.
Leverage Happy Customers If you’ve been in business for a while, you surely have great customers that return year after year. Use them to your benefit to get more happy customers. Encourage them to take a live video stream of their experience – this is an incredible way for others to see what you offer. Make sure customers know it’s perfectly acceptable to take videos or via Facebook Live. It’s the best kind of testimonial.
Encourage reviews and referrals by offering incentives such as a discount on their next trip. Make sure you include links to your TripAdvisor or Yelp pages, so they can easily share their experience with others. Happy customers are usually thrilled to share their experiences with their friends and family.
Keep in touch with previous customers. Build an email list of all your customers, and send newsletters, helpful tips, or special offers to them. It’s a great way to keep your business in the forefront of their minds, especially when their dear Aunt Sally is looking for recommendations. During your off season, send them information about your upcoming season, and encourage them to book early to get the best spot for their next summer adventure.
Make sure your SEO is at it’s best. Most people use Google or other search engines to find adventure, so ensure that your business is at the top of their search list. Make certain that your Search Engine Optimization (SEO) is at the top of its game by adding the best keywords to describe your business. This will lead those “Google searchers” to find you first before your competition.
These are only a few key tips to keep your business rolling this summer. Most importantly, if you LOVE what you do, and are passionate about it, then folks will find you and be thrilled they did.
WebReserv & GDPR
In order to remain compliant with the upcoming General Data Protection Regulation (GDPR), WebReserv has put new privacy policies in place. The GDPR places new obligations on organizations that process EU personal data.
Moving forward, the WebReserv system no longer defaults to “yes” for email opt-in. Customers will manually have to check the opt-in checkbox. In addition, WebReserv has never collected or use customer information other than what is included in the reservation that was made through the system.
Businesses that use WebReserv should be aware that previous opt-ins for customers located in the European Union may not be valid anymore. A good practice is to ask customers if they want to opt-in to receiving emails from you, and if not you can remove them from your mailing list.
We hope these updates will help you and your customers feel secure that their personal data is safe, and they are in control of how they want to be contacted. Please note that nothing in this notice constitutes legal advice.
The In/Out Report – a great tool for managing your rentals
WebReserv offers various types of useful reports. The In/Out report is an excellent report that will help you manage your rental inventory.
The In/Out report is similar to a Reservations Report except it will define what rentals are going Out for the day, and what rentals are due to come back In for the day. This is very helpful during busy times when you need to keep track of bookings and your inventory while still providing the best customer service.
In order to activate the report to work for rentals, follow the steps below.
- In your WebReserv account, go to Setup – Business Information – Advanced Options. In the General section, set the Check In/Out option to “Check-out before Check-in“. Save your changes.

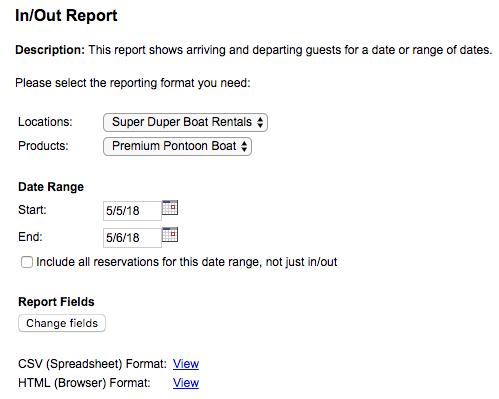
2. To run the report, go to Frontdesk – Reports – select In/Out Report.
- Select your product or ALL.
- Enter your date range.
- Select if you want the report to show only Out and In dates (default), or if you want to see all bookings in between those dates.
- Choose the Change fields button to customize what columns you want to see on the report.
- Select what format you want to view the report in – HTML will open in a new browser or CSV will download the report into a spreadsheet (Excel).
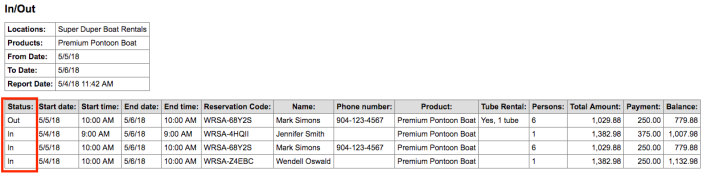
Based on your report settings, the report will show first all rentals that will be going OUT for the date range, and then it will show all rentals that will be coming IN for that date range. This will be noted in the Status column.
If you want to know more about all the features that WebReserv offers, visit us at www.webreserv.com, or send us an email to support@webreserv.com.
You asked, we answered! New Enhancements to WebReserv.
That’s right, we’re listening! We recently made a few enhancements to the booking system, and we’re excited to let you know about them. See what we’ve done below.
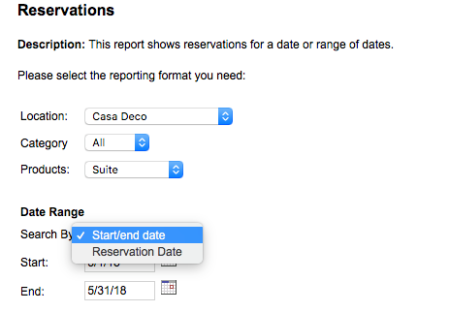
Added a Search by Reservation Date to the Reservations report.
The Reservations report is our most comprehensive report that gives you all the details about bookings within a time frame that you specify. You now have 2 options for that time frame: Date of Reservation or Start/End Date. Date of Reservation refers to the date that the booking was actually made by the customer. Start/End date refers to the actual visit date of the booking. This is a helpful enhancement as it will allow you to see how many bookings you had on a given day or set of days.
To access the report, navigate to Frontdesk – Reports in your account. Select the Reservations report.
Additional Customization options on the Home page.
The first view that you see when you log into your WebReserv account is the Home page. This is your dashboard and will list all recent bookings in your system. You are able to customize what columns from the booking that you want to see on this page. We recently added additional options for columns to further customize how you want to view your bookings. New options include:
1. Customer’s phone number
2. Customer’s email address
3. Unit name (if defined)
4. Office Notes
To customize your Home page, click on “customize this page” from the Home page. On the Customize Page screen, drag and drop the desired columns from the Available Columns box to the Selected Columns box. Save your changes.
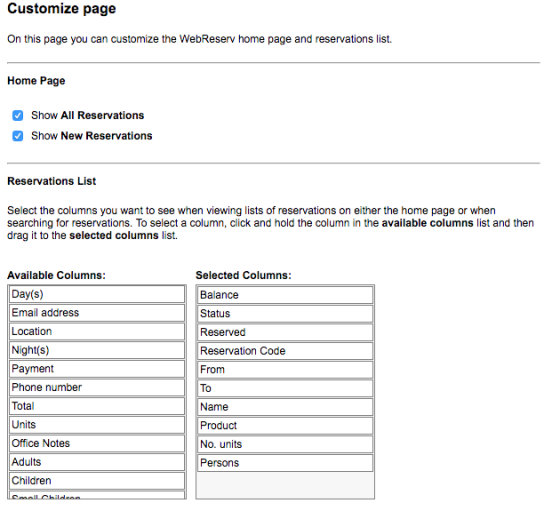
Here’s a look at the view with all the new options added. This is helpful for many businesses who want to be able to see the customer’s phone number at a glance to reach out to them, or see exactly what rental or camp site is booked for the day.

We always strive to make improvements and enhancements to our booking system. If you have any suggestions, please send us an email to support@webreserv.com. We’d love to hear from you!
